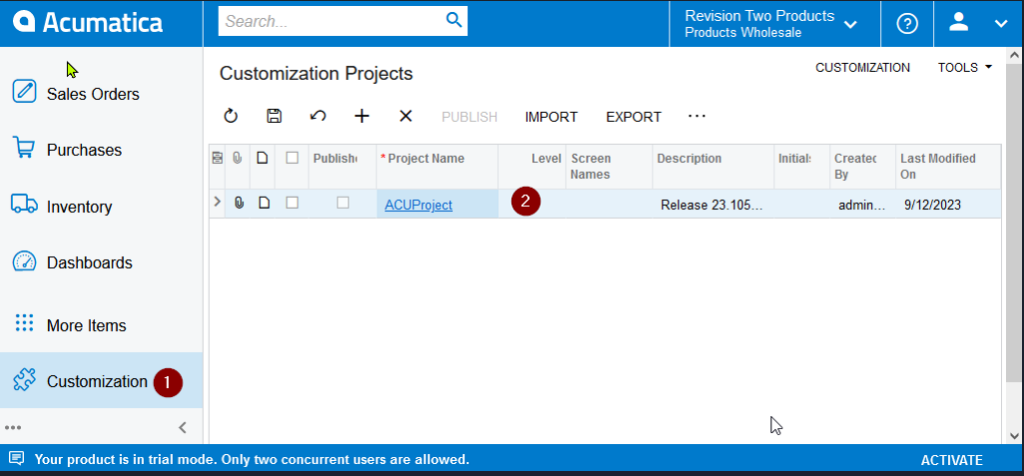
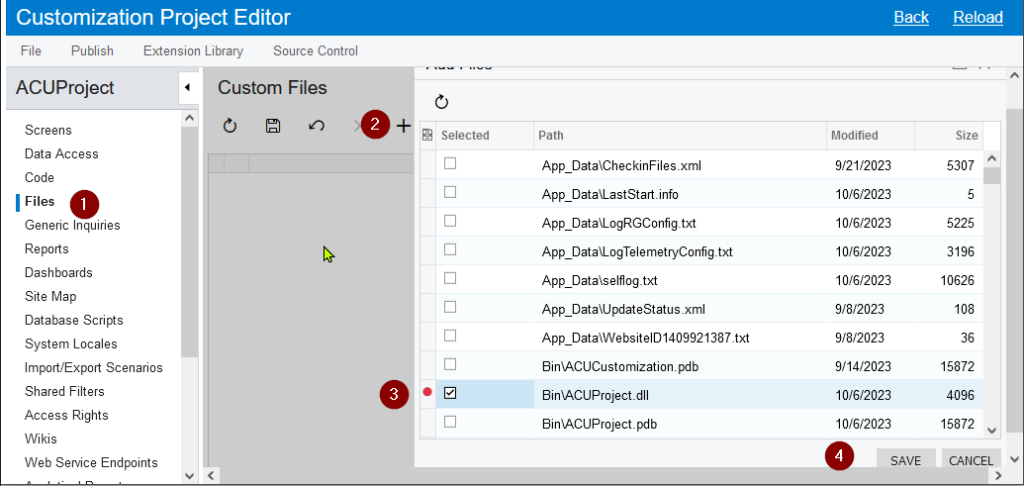
In this section, we’re diving into a hands-on example of creating an Acumatica customization project using ACUCustomizationUtil.
Initialize the Project Repository: Start by creating and then cloning the project repository to the designated root directory.
For context, let’s break down the specifics we’re working with:
Variable name | Value |
Repository Name | ACUProject |
Project Name | ACUProject |
ERP & Acumatica Base Path | C:\Acumatica |
Customization Project Base Path | C:\Acumatica/project |
Environment Variable for Base Path | %ACUBASEDIR% |
ERP version | 23.105.0016 |
Project’s Directory Structure:
PowerShell
ACUProject
├───cst customization project source code
├───pkg customization packages
└───src C# project – extension library
└───ACUProject
.gitignore
acu.json
Directory.Build.props
ACUProject.sln
README.md
For the sake of this example, we’ll operate under the assumption that the ERP and Acumatica instances are not installed on your system. If you find yourself needing to perform installation check steps, detailed instructions can be found in the User’s Guide.
Now that you have your project’s repository set up in your preferred version control system (such as GitHub or Bitbucket), the next step is to clone it to your local PC. Here’s how you do it:
PS C:\Acumatica> cd C:\Acumatica\project
PS C:\Acumatica\project> git clone –progress `
-v https://you.username@url.to.you.repository/repository.project/acuproject.git ACUProject
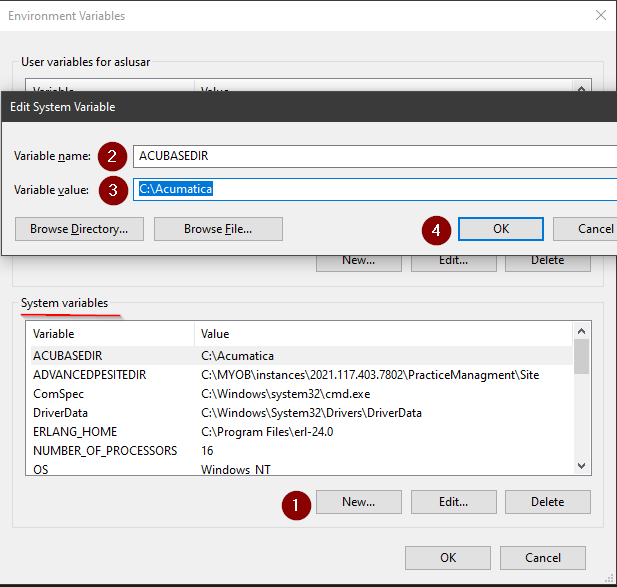
Before diving into the coding process, it’s essential to set up the appropriate environment variables. This will make certain processes more straightforward and ensure that everything runs smoothly. Let’s set up the ACUBASEDIR system variable:

Open PowerShell and run the following commands:
PS C:> cd C:\Acumatica\project
PS C:\Acumatica\project> mkdir cst
PS C:\Acumatica\project> mkdir pkg
PS C:\Acumatica\project> mkdir src
PS C:\Acumatica\project> tree
ACUProject
├───cst
├───pkg
└───src
Copy the acu.json file from the ACUCustomizationUtil installation directory and edit it according to our requirements:
{
“erp”: {
“erpVersion”: “23.105.0016”,
“installationFileName”: “AcumaticaERPInstall.msi”,
“destinationDirectory”: “%ACUBASEDIR%\\erp”,
“url”: null
},
“site”: {
“instanceName”: “23.105.0016”,
“instancePath”: “%ACUBASEDIR%\\instance\\23.105.0016\\Site”,
“sqlServerName”: “localhost”,
“dbName”: “23.105.0016DB”,
“acumaticaAdminName”: “admin”,
“acumaticaAdminPassword”: “123”,
“dbConnectionString”: null,
“acumaticaToolPath”: null,
“iisAppPool”: null,
“iisWebSite”: null
},
“pkg”: {
“url”: “http://localhost/23.105.0016/api/ServiceGate.asmx”,
“login”: “admin”,
“password”: “123”,
“pkgName”: “ACUProject”,
“pkgDirectory”: “pkg”,
“tenant”: null
},
“src”: {
“pkgSourceDirectory”: “cst”,
“pkgLevel”: “0”,
“msBuildSolutionFile”: “ACUProject.sln”,
“msBuildTargetDirectory”: “src\\ACUProject\\bin\\Release”,
“msBuildAssemblyName”: “ACUProject.dll”,
“makeMode”: null,
“pkgDescription”: null
}
}
Run the following commands to install ERP:
PS C:\Acumatica\project> cd ACUProject
PS C:\Acumatica\project\ACUProject> acu erp download
PS C:\Acumatica\project\ACUProject> acu erp install
Let’s check that ERP is installed
C:\Acumatica
└───erp
└───23.105.0016
└───Acumatica ERP
To install Acumatica instance, run the following commands:
PS C:\Acumatica\project\ACUProject> acu site install
While the process of creating a project for customization is comprehensively outlined in the Project Setup Manual, it’s essential to highlight a few important aspects for seamless integration:
1.The project is created as a .NET Framework 4.8.x class library
2. The **Directory.Build.props** file contains the **SiteDir** variable, its value must contain the full physical path to Acumatica instance:
Directory.Build.props file
<Project>
<PropertyGroup>
<TargetFramework>net48</TargetFramework>
<SiteDir>C:\Acumatica\instance\23.105.0016\Site</SiteDir>
</PropertyGroup>
</Project>
3. The **$(SiteDir)** variable will be used in the future when describing paths to referenced resources from an Acumatica instance:
Project file
<ItemGroup>
<Reference Include=”PX.Common, Version=1.0.0.0, Culture=neutral”>
<SpecificVersion>False</SpecificVersion>
<HintPath>$(SiteDir)\Bin\PX.Common.dll</HintPath>
</Reference>
<Reference Include=”PX.Data, Version=1.0.0.0, Culture=neutral”>
<SpecificVersion>False</SpecificVersion>
<HintPath>$(SiteDir)\Bin\PX.Data.dll</HintPath>
</Reference>
<Reference Include=”PX.Objects, Version=1.0.0.0, Culture=neutral”>
<SpecificVersion>False</SpecificVersion>
<HintPath>$(SiteDir)\Bin\PX.Objects.dll</HintPath>
</Reference>
</ItemGroup>
4. Add the Before Build rule to the project file, which is necessary for versioning when building the project.
Project file
<Target Name=”BeforeBuild”>
<ItemGroup>
<AssemblyAttributes Include=”AssemblyVersion”>
<_Parameter1>$(Version)</_Parameter1>
</AssemblyAttributes>
</ItemGroup>
<MakeDir Directories=”$(IntermediateOutputPath)” />
<WriteCodeFragment Language=”C#” OutputFile=”$(IntermediateOutputPath)Version.cs” AssemblyAttributes=”@(AssemblyAttributes)” />
<ItemGroup>
<Compile Include=”$(IntermediateOutputPath)Version.cs” />
</ItemGroup>
</Target>
5. Add an event handler to the Post Build project file that copies the build file to the Bin Acumatica instance directory.
Project file
<PropertyGroup>
<PostBuildEvent>
xcopy /F /Y $(TargetPath) $(SiteDir)\Bin\
xcopy /F /Y $(TargetDir)$(TargetName).pdb $(SiteDir)\Bin\
</PostBuildEvent>
</PropertyGroup>
6. NuGet package Acuminator must be installed for the project:
Project file
<ItemGroup>
<Analyzer Include=”..\..\packages\Acuminator.Analyzers.3.1.2\analyzers\dotnet\cs\Acuminator.Analyzers.dll” />
<Analyzer Include=”..\..\packages\Acuminator.Analyzers.3.1.2\analyzers\dotnet\cs\Acuminator.Utilities.dll” />
</ItemGroup>
7. Solution file (ACUProject.sln) should be moved to the root project folder and edit the Extension Library project path.
8. Acumatica instance is NOT plugged into the solution. This is done as a bookmark for a future solution to remove the dependency of the project on Acumatica instance.
After all the steps care complete, the folder should look like this:
PowerShell
C:\Acumatica\project\ACUProject
├───cst
│ ├───Bin
│ │ ACUProject.dll
│ │
│ └───_project
│ ProjectMetadata.xml
├───pkg
│ ACUProject.zip
├───src
│ └───ACUProject
│ │ ACUProject.csproj
│ │ packages.config
│ └───Properties
│ AssemblyInfo.cs
│ .gitignore
│ acu.json
│ ACUProject.sln
│ Directory.Build.props
Creating a Customization Package:


To extract the source code from the customization package, run the following command:
PS C:\Acumatica\project\ACUProject> acu src get
The cst directory for the customization source code now looks like this:
C:\Acumatica\project\ACUProject
├───cst
│ ├───Bin
│ │ ACUProject.dll
│ │
│ └───_project
│ ProjectMetadata.xml
To initiate the building of customization packages, run the following commands in your PowerShell terminal:
PS C:\Acumatica\project\ACUProject> acu src buld
PS C:\Acumatica\project\ACUProject> acu src make
PS C:\Acumatica\project\ACUProject> acu src make –mode QA
Once executed, inspect the pkg directory. If everything went as planned, you should see two files:
Now, it’s crucial to validate that the constructed customization can be effortlessly integrated into the Acumatica instance. Execute the following commands:
PS C:\Acumatica\project\ACUProject> acu pkg upload
PS C:\Acumatica\project\ACUProject> acu pkg publish
A successful execution signifies the package’s successful upload and publication to the Acumatica instance. Now you’re on the right track!
Now that your project is set up, it’s time to push it to the repository. But first, you want to ensure that certain files or directories don’t get included. To do that, create a .gitignore file in the project’s root folder. This file specifies patterns of files and folders that should be ignored when committing to the repository.
Here’s what you should add to your .gitignore:
acu-log*.txt
/pkg/*.zip
bin
obj
Debug
Release
.vs
Before you push to the repository, it’s essential to double-check the files you’re about to commit. Using the git status command will give you an overview of these files:
PS C:\Acumatica\project\ACUProject> git status
On branch develop
Your branch is up to date with ‘origin/develop’.
Changes to be committed:
(use “git restore –staged <file>…” to unstage)
modified: .gitignore
new file: ACUProject.sln
new file: Directory.Build.props
new file: acu.json
new file: cst/Bin/ACUProject.dll
new file: cst/_project/ProjectMetadata.xml
new file: pkg/ACUProject.zip
new file: src/ACUProject/ACUProject.csproj
new file: src/ACUProject/Properties/AssemblyInfo.cs
new file: src/ACUProject/packages.config
Once you’re sure everything is in order, commit and push your changes:
PS C:\Acumatica\project\ACUProject> git commit -i “Add customization project & configuration”
PS C:\Acumatica\project\ACUProject> git push origin develop -f
Congratulations! You’ve successfully created a new customization project and automated its setup using the ACUCustomizationUtil utility.
Once your customization project is set up, its configuration saved, and its files committed to the repository, reinstating the environment becomes a breeze.
Notice the difference?
The detailed instructions we walked through for project creation contrasts with the brief steps for project deployment. Let’s dive into this streamlined process:
To kick off the deployment, start with cloning the repository.
Go to the root folder of your customization projects, open PowerShell and run the command:
PS C:\Acumatica> cd C:\Acumatica\project
PS C:\Acumatica\project> git clone –progress `
-v https://you.username@url.to.you.repository/repository.project/acuproject.git ACUProject
Before diving into the setup, it’s crucial to verify the acu.json configuration file. Does it reference any environment variables, such as %ACUBASEDIR%, within its path parameters? If so, you’ll need to establish these variables. Their values should also be clearly documented in the repository’s readme file for easy reference.
If these values aren’t explicitly mentioned, you can deduce them from the Directory.Build.props file. Ensure that the SiteDir parameter aligns with the site.instancePath in the acu.json configuration file.
For instance, if we consider the scenario:
Directory.Build.props
<Project>
<PropertyGroup>
<TargetFramework>net48</TargetFramework>
<SiteDir>C:\Acumatica\instance\23.105.0016\Site</SiteDir>
</PropertyGroup>
</Project>
acu.json
{
…
“site”: {
…
“instancePath”: “%ACUBASEDIR%\\instance\\23.105.0016\\Site”,
…
},
…
}
the value of the environment variable will be:
***%ACUBASEDIR% = C:\Acumatica***
Check the availability and, if necessary, install the appropriate ERP version:
PS C:\Acumatica\project\ACUProject> acu erp download
PS C:\Acumatica\project\ACUProject> acu erp install
Check availability and install Acumatica instance if necessary:
PS C:\Acumatica\project\ACUProject> acu site install
Begin by compiling your extension library project, then move on to generating a customization package. Execute the following commands:
PS C:\Acumatica\project\ACUProject> acu src build
PS C:\Acumatica\project\ACUProject> acu src make
Now, it’s time to get your package onto the Acumatica instance. Use these commands to both upload and then publish the package:
PS C:\Acumatica\project\ACUProject> acu pkg upload
PS C:\Acumatica\project\ACUProject> acu pkg publish
That’s it. After executing all the commands successfully, developers are equipped with an environment primed for customization project development. It is a convenient and swift process, don’t you agree?
Despite its seemingly straightforward functionality, the ACUCustomizationUtil utility is quite a complex tool. This is our team‘s third iteration of such a utility, and we are still exploring all possible scenarios of interaction between the utility, the user, Acumatica instance, and the operating system.
More time was invested in crafting the current version than we initially anticipated. This was mainly due to a shift in our approach to implementation – we transitioned from utilizing PowerShell scripts to relying on pure C#. This shift also brought about new challenges. For instance, we had to wrap the call of any *.exe file in C# code, intercept the message stream from this file, and then format it to provide a display of progress.
However, every challenge was an opportunity for growth. Our commitment to this utility development underscores its exceptional value. At Sprinterra, ACUCustomizationUtil isn’t just a theoretical asset – it’s a proven tool in our Acumatica projects. By automating processes, we’ve cut development time and minimized errors.
We are committed to refining the code, fixing minor bugs, and incorporating improvements down the road. And, of course, we look forward to sharing our findings and successes with the community in the future.
Get the latest insights on exponential technologies delivered straight to you
We use cookies to improve your experience on our site. By using our site, you consent to cookies.
Manage your cookie preferences below:
Essential cookies enable basic functions and are necessary for the proper function of the website.
Google reCAPTCHA helps protect websites from spam and abuse by verifying user interactions through challenges.
Google Tag Manager simplifies the management of marketing tags on your website without code changes.
Statistics cookies collect information anonymously. This information helps us understand how visitors use our website.
Google Analytics is a powerful tool that tracks and analyzes website traffic for informed marketing decisions.
Service URL: policies.google.com (opens in a new window)
Clarity is a web analytics service that tracks and reports website traffic.
Service URL: clarity.microsoft.com (opens in a new window)
Marketing cookies are used to follow visitors to websites. The intention is to show ads that are relevant and engaging to the individual user.
LinkedIn Insight is a web analytics service that tracks and reports website traffic.
Service URL: www.linkedin.com (opens in a new window)
You can find more information in our Cookie Policy and Privacy Policy.